How do I work with References in Elsa?
Last updated on February 05, 2026
Elsa Users have a variety of ways to add references to their chapters including by uploading a RIS file, importing a Word document, creating a reference with Elsa’s reference manager using PubMed ID or copying and pasting references into the reference library.
It’s important to remember that Elsa will automatically format your reference to the style selected for your project. If you would like to know which reference style has been selected for your project, contact an Elsevier staff member.
Reference Styles
Reference style for an Elsa project is determined at project set-up though can be changed up until the project is sent to production pending Editor and/or Elsevier staff approval.
Elsa supports these reference styles:
- APA
- AMA
- Harvard
- Embellished Vancouver
- ACS
- Numbered
- Vancouver
Once a reference style is chosen, Elsa will automatically format any imported or newly created references so they adhere to the chosen reference style.
Changing a Reference Style after a project has already started will change any existing references to the new style you are choosing, so there is no need to manually reenter references.
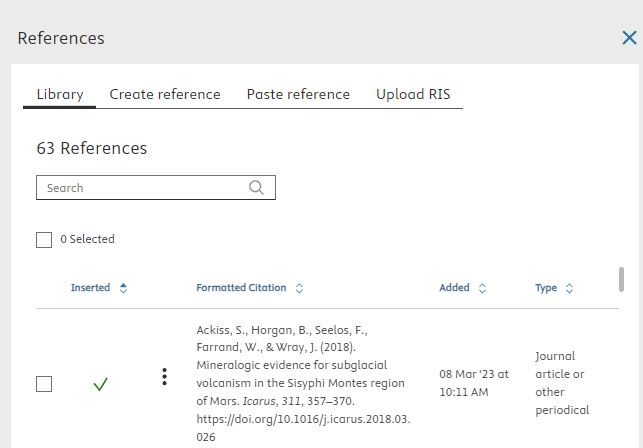
In order to insert or link references in Elsa, you must first have added these references to your reference library. This can be done by
- Navigating to the Insert section of the toolbar
- Clicking on the References icon
The References window will open and you can select "Create Reference", "Paste Reference", or "Upload RIS"
- Create Reference allows you to use Elsa’s built-in reference manager. Just select the type of reference from the drop-down menu and fill in the related fields
- Paste Reference allows you to paste a reference entry that has already been created in order to add it to the reference library. Just copy and paste the reference(s) into the field and select Save to Library. If you would also like to create an in-text citation at the same time, click Insert and the reference will be added to your text and saved to your reference library.
Upload RIS allows you to upload references you may have in another reference manager such as Mendeley, EndNote or Zotero.
Follow the instructions here: How do I export my references in RIS format from my reference manager of choice? to export the file from your current reference manager and then select Browse> select your exported file> Save to Library to add the library to Elsa. You may need to link your references to identify which references are used within the text.
- Import a Word File If you imported a Word file including a reference list, your references should be automatically added to the reference library and linked to the corresponding in-text citations if they have been added. For more information about adding references via Word import or troubleshooting unlinked references visit How do I import a Word document?
You can create references in a variety of ways including:
Manually creating references
When you click on ‘Create’ you can manually enter reference information to create references from scratch.
- PubMed ID lookup is available under the ‘Create’ option. To use, enter your PubMed ID and then click on the blue arrows. All reference fields will auto-populate.
The DOI field is available to manually enter a DOI, but DOI lookup is not available.
Uploading from RIS
Major reference manager applications like Mendeley, EndNote, and Zotero can export references in RIS format. You can then upload those RIS (or .txt) files to your chapter by clicking 'Upload from RIS' on the References tab or on the toolbar.
For more information, see this FAQ.
Pasting references
You can copy references from text (like a Word Document) and paste into Elsa.
For more information, see this FAQ.
Once you have created your reference library, you will want to create in-text citations by inserting your references. Inserting references also automatically creates a reference list, which is transmitted to our production teams and is important in distinguishing which references were cited within the text as opposed to a general bibliography.
If you imported a Word file and RIS file separately, you will still want to insert your references to create links between the two and to generate a reference list.
If you imported a Word file, your in-text citations may have already been linked though you may need to re-link some citations if they were not recognized during import.
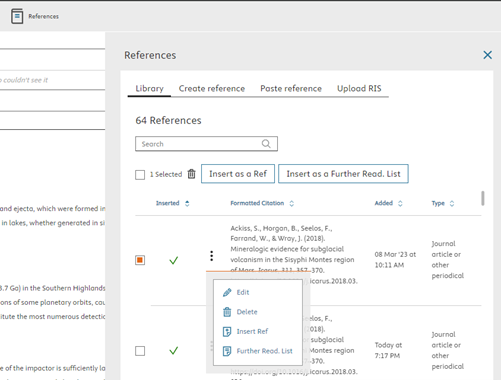
To create an in-text citation/link your reference:
- Click Insert on the toolbar
- Click on the Reference icon on the right-side of the toolbar
- Click on the tick box next to the reference or references you would like to insert and select Insert as a Reference or select Insert as Reference from the More Options (three dots menu)
The citation will then be added to your text
Elsa may display a low confidence score for references added via Word Import, Paste References, or Import RIS.
When a reference is added using any of these methods, it is sent to our reference matching service. This service checks each reference against Scopus, Crossref, and PubMed, matches it to indexed records where possible, fills in missing details (such as DOIs or page numbers), and then returns the enhanced reference to Elsa.
While the service accurately matches most reference types, it can occasionally struggle with books, URLs, and certain non-standard references (for example, conference reports). In these cases, the service may be unable to find a reliable match. When that happens, the data can be incomplete or split across multiple fields, resulting in a low confidence score.
If a low confidence score is recorded:
Elsa retains the reference exactly as submitted.
An icon indicates that the reference has a low confidence score.
- The reference is not reorganized or corrected by the matching service.
All reference content is stored in the Title field within the reference library.
You do not need to edit the reference: reference formatting will be finalized in production and you will have the opportunity to review a final proof to ensure all work is properly credited.
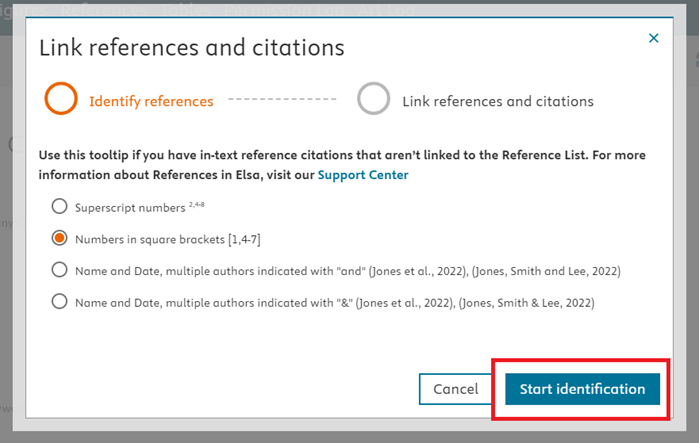
If you have pasted text into Elsa or imported a Word file and not all of your references have been linked and/or recognized by Elsa, then you will want to link your citations to generate a correct reference list. You may also need to link your citations if you imported text containing in-text citations and a .RIS file separately.
You can do this by navigating to the top toolbar and clicking on the Link Citations icon:

On the next screen, choose the reference style of the document you imported or from which you copied and pasted then select "Start Identification":
Elsa will search your document for unliked references and verify once linking has been successfully completed:
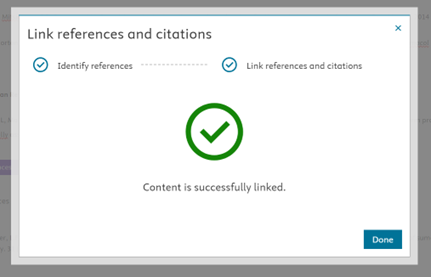
Note that you may still have to manually link some references if Elsa cannot identify a connection between a reference from the reference list and an in-text citation.
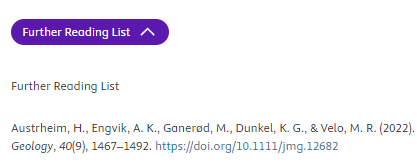
If you would like to share a list of additional references or bibliography, you can add a Further Reading List via the toolbar.
To add a Further Reading List:
- Ensure the references you would like to include have been added to your reference library, if not, add them as noted in step 1.
- Click on the Insert ribbon of the toolbar
- Click on the Further Reading List icon
- Select the references you would like to include in your Further Reading List
- Click Insert as a Further Reading List at the top of the window or via the More Options ellipsis icon
Further Reading List will appear below the references section at the bottom of the page. You can then rename the title of the list by deleting the plain text “Further Reading List” below the purple pill. Note the purple pill cannot be changed.
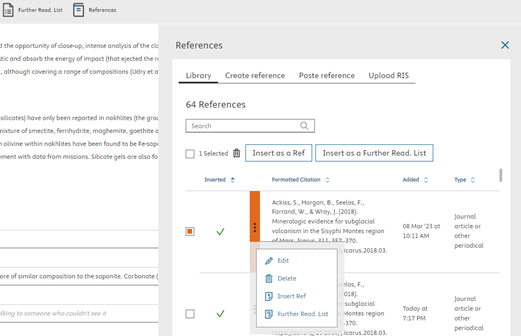
To edit or delete a reference:
- Select "Insert" on the toolbar
- Click on the References icon
- Click on the More Options ellipsis menu next to the related reference(s)
- Select "Edit" to open the reference information and make changes to the related fields. Don’t forget to click save at the bottom of the page!
- Select "Delete" and confirm that you would like to delete the reference
For information about importing references via a Word file, please visit this FAQ.
If you receive a “Low Reference Count” error in the Publishing Assistant, this indicates you have too few in-text citations and most likely need to link your references (see Inserting References section).
Did we answer your question?
Related answers
Recently viewed answers
Functionality disabled due to your cookie preferences