How do I set up, manage, import and share my Email Alerts?
Last updated on September 30, 2023
You can set up email alerts to notify you of new articles or publications related to a specific search.
Please note: |
|
How
To set up, import, edit or delete an alert, click on the relevant option below to view the steps.
You can set up your email alerts from your Search Results or Saved Searches page.
Follow these steps to set up an alert:
- Perform a search and click ‘Set email alert’ at the top of your Search Results list.
OR
- Click ‘My tools’ in the top bar and select ‘Saved Searches’
- Tick the box in front of the saved search you would like to set an alert on
- Click ‘Set Email Alert’
The email alerts popup window will appear.
- Fill out the following fields:
Field name | Function |
|---|---|
Alert name |
This will be the name featured in the email alerts list and the subject of the email alerts. |
Comments (optional) |
Enter more details about the alert (e.g. Project name, paper title you set the alert for) |
Email address(es) |
Enter the email address for alert notifications.
|
Email format |
Select the format of your alert email:
|
Content selection |
|
Frequency |
|
Alert sent |
Tick this box if you’d only like to receive alerts when there are results for your search. |
Articles in press and in process |
Tick this box to also include Articles in press and in process to your search results. |
To review your alerts, click ‘Email Alerts’ in the ‘Tools’ dropdown menu. On the left side of the page you'll see an overview of different details and options you can apply to either a selection (or all) of your alerts or one specific alert.
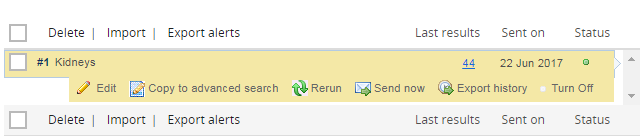
You will see the following details about your alert(s):
- Last results: The number of results your query had when the alert was last sent out. Clicking this number takes you to the Search Results page.
- Sent on: The date your last alert was sent to you by email.
- Status: A green dot means your alert is active, a white dot means that your alert is inactive.
On the right side of the page further details on the alert you select (e.g. frequency, email format, comments) will be displayed.
You can make the following changes to your alert(s):
- Delete: Deletes your alert(s) entirely.
- Import: Import one or a list with alerts. Learn more
- Export alerts: Export your alert(s) in CSV-format
When hovering over a specific alert, you have the following options:
- Edit: Will open the ‘Edit email alert’ window and allow you to edit all options you gave in when creating the alert
- Copy to advanced search: Will copy your query to the Advanced Search page where you can edit and rerun your search
- Rerun: Will rerun your query and bring you to the Search Results page
- Send now: A Send Now alert containing results since the alert was last run until now will be sent to all email addresses specified in the settings for this alert
- Export history: The alert number, name, start date, frequency, query, email addresses, event type, date/time of event and records included will be exported
- Turn off: Turn your alert off if you would temporarily like to suspend your alert
You can rerun your alerts at any time.
Please Note: When rerunning email alerts that include Articles In Press and In Process records, the number of hits may be higher than expected. To ensure identical results over time, deselect the 'Include Articles in press and in process' box when creating your alert. That way only fully indexed records are retrieved in your email alert search.
Follow these steps to rerun a specific alert:
- On any Embase page, click 'Tools' in the top menu and select 'Email Alerts'.
- Hover over the Alert you would like to rerun and click 'Rerun'. The query wil run in Embase and you will be taken to the Search Results screen.
- To run your query for a specific date (for instance if you haven't received the alert in your inbox for that day), click the blue number under 'Last Results' to take you to the results that were last sent to you by email. To change the date, go to the Results page and click 'Date' under the Search field. Here you will be able to select a date range in which the article was added.
- To send the results to your emaill, click 'Send now' instead of 'Rerun'.
- A Send Now alert containing results since the alert was last run until now will be sent to all email addresses specified in the settings for this alert.
External email alerts can be imported in .cvs-format. We recommend using Excel or a similar program for creating the file.
Follow these steps to import an email alert:
- Open an Excel spreadsheet document with only one worksheet or use our template (downloads .csv-file).
- Delete any additional worksheets that appear by default.
- Define ten columns as defined in our Column definitions
Column number
Content
Column 1: Content Selection
This defines the format that is exported when your Email Alert is run. Enter one of the following values using lowercase: cit, citterms, citabs or citall, defined as follows:
- cit: citations only
- citterms: citations and index terms
- citabs: citations and abstracts
- citall: citations, abstracts and index terms
- full: citations, abstracts, index terms and additional information (full record)
Column 2: Disabled
This defines the status of the Email Alert:
- True: Email Alert is Disabled (Turned Off)
- False: Email Alert is Enabled (Turned On)
- For further details of changing the Email status, see above.
If no status is defined, the False status (Enabled) is used as default.
Column 3: Email Address
Enter the email address or addresses to which you wish the Email Alert to be sent. Separate addresses with a semi-colon ( ; ). At least one Email address is required; any number may be entered.
Column 4: Email Format
This defines the format of the Email Alert:
- Text: Email Alert will be sent in text format
- HTML: Email Alert will be sent in HTML format
- RIS: Email Alert will be sent in text format with RIS file as an attachment
- If no format is defined, HTML will be used as default.
Column 5: Alert Title
This defines the title of the Email that will be sent. If no title is defined, the first 150 characters of the Search Query (Column 10) are used as default.
Column 6: Frequency
This defines how frequently the Email Alert is run:
- Daily: Email Alert will be run every day
- Weekly: Email Alert will be run every week
- TwoWeekly: Email Alert will be run every two weeks
- Monthly: Email Alert will be run every month
- TwoMonthly: Email Alert will be run every two months
- ThreeMonthly: Email Alert will be run every three months
- SixMonthly: Email Alert will be run every six months
- Yearly: Email Alert will be run every year
If the frequency is not defined, the Email will be run weekly.
In some cases, you may define the day on which the Email Alert is run: see Preferred Day (Column 7).Column 7: Preferred Day
Choose a Preferred Day in combination with the Frequency (Column 6), as follows:
- If Frequency is Daily: the Preferred Day is ignored
- If Frequency is Weekly: enter one of the values: Sun, Mon, Tue, Wed, Thu, Fri, Sat
- If Frequency is Two Weekly: enter one of the values: Sun, Mon, Tue, Wed, Thu, Fri, Sat
- If Frequency is Monthly: enter the day of the month (1-31). See note following
- If Frequency is Two Monthly: enter the day of the month (1-31). See note following
- If Frequency is Three Monthly: enter the day of the month (1-31). See note following
- If Frequency is Six Monthly: enter the day of the month (1-31). See note following
- If Frequency is Yearly: enter the month & day in the format MMM d or MMM-d, e.g. Jan 7 or Jan-7
In Excel, text format should be enforced by the use of an initial quote character, e.g. ‘Jan 7 or ‘Jan 7.
Please Note: If the day does not exist in a particular month, the Email Alert is run on day 1 of the following month.Column 8: Articles in Press
This defines whether Articles in Press are included in the Email Alert:
- True: Articles in Press are included
- False: Articles in Press are excluded
If no format is defined, the True status (Articles in Press included) is used as default.
Column 9: Suppress when No Hits
This defines whether an Email Alert is suppressed in the event that there are no hits:
- True: Email Alert is suppressed when there are no hits
- False: Email Alert is not suppressed when there are no hits
If no format is defined, the False status (Email Alert NOT suppressed when no hits) is used as default.
Column 10: Search Query
Enter the full search query to be executed in this column; this information is required. The search should be expressed as a single query, i.e. separate lines are not permitted. Take note of the tips (above) for entering commas and quotes. After completing the spreadsheet (with one email alert defined on each row), save it as a .csv file using the Save As option in Excel.
- Column headers are not allowed. Column definitions are for guidance only.
- In the first column of the .csv file, only use lower case (e.g. cit, citabs). This column is case-sensitive.
- If the first search term is a phrase delineated by quotes, ensure that the first quote is visible in the Excel cell.
- Alternatively, use hyphens to delineate the first phrase, as in this example, taking care to remove any hidden initial quotes. e.g. ‘heart attack’:ti => heart-attack:ti
- We recommend the use of a text editor, such as notepad to construct the .csv file. This will help to ensure no errors are introduced.
- Within each row, enter the data for a single search.
- You may use any combination of upper and lower case letters, except in the first column, where you must use lower case.
- Save the Excel spreadsheet in .csv format.
- In Embase, click 'My Tools' in the top bar and select 'Email Alerts'.
- Click 'Import'.
- In the popup, click 'Choose file' to browse for your prepared .cvs-file. Select the file and click 'Import Alerts'.
Also, view the video on ‘Managing your search’:
Did we answer your question?
Related answers
Recently viewed answers
Functionality disabled due to your cookie preferences